The ignition system is essential to the proper operation of your car’s engine. Keeping it well maintained can help you keep your car on the road longer.
The following procedure can be done fairly easily. However, if you don’t feel comfortable doing any of the steps, don’t hesitate to contact a qualified technician.
To do the procedure you will need the following tools and items: socket wrenches and screwdrivers, boot puller, dialectric grease, anti-seize grease, ohm-meter, compression gauge (this can be rented or bought), gapping tool, battery terminal puller, voltmeter, masking tape, marker, and battery terminal cleaning tool.
You may need to replace the following items: spark plugs, spark plug wires, rotor and distributor cap.
Also, always buy the service manual for your car and follow it carefully. Doing the job right the first time will prevent costly repairs later.
Procedure
Getting Started
Remove the fan shroud underneath the hood of your car. Keep it handy, because you will need to refer to information printed on the back of it later in the procedure.
Very Important: disconnect the ignition coil’s primary wires before starting to work on the ignition system. This will help prevent damage to your ignition system and also keep you safer!
Compression Test
At this point, remove the spark plug wires using your boot puller, and remove the spark plugs from the engine. Put masking tape on each wire and write the corresponding piston number on each one. Then, screw the compression gauge into the spark plug hole and crank the engine. This will give you the reading. Write this information down and repeat for each cylinder. The service manual will list the optimal p.s.i. reading for your vehicle. Although you don’t need to exactly match this number, there should be no more than a 10 to 15 percent variation.
If you receive a low reading on two adjacent cylinders, this may indicate a failed cylinder-head gasket. If you have a low reading on one cylinder, you may have a faulty valve or piston ring. Have your mechanic service these for you. You should probably expect an expensive repair bill.
Inspect your spark plugs.
Since the spark plugs are out of the engine, this is a great time to inspect them. Look at the electrodes at the bottom of the plugs. If they are whitened, show wear, or have carbon deposits on the electrode, they need to be replaced.
Install your new spark plugs.
Before putting your new spark plugs into the engine, you need to “gap” the plugs. To do this, check the gap distance listed on the sticker on your fan shroud. Then, take a wire gauge and measure the distance between the center electrode and the ground electrode. Use your gapping tool to bend the ground electrode to the proper distance.
Before reinstalling the plugs, apply some anti-seize grease to the threads so that they will come out more easily the next time you replace them. Don’t over-tighten your plugs. Simply tighten them until the tapered seat portion comes in contact with the cylinder head, then turn it 1/8 of a turn more.
Replace the spark plug wires.
It is a good idea to replace the wires that connect your spark plugs to the distributor cap at this point as well. Take each wire off one at a time, and match its length with the new wire from the replacement set. Before putting the new wire on put some dialectric grease on the end of each spark plug to prevent corrosion. Make sure to route each wire exactly the same way as the old wire. Replace any wire looms or separators if broken. Criss-crossing wires can cause cross-fire or arcing which makes your engine run rough.
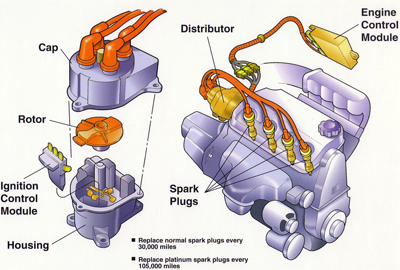
Check the distributor cap and rotor.
This is a good time to take a look at the distributor cap. Over time it can wear out and cause an increase in the distance between the cap and the rotor contacts. Unscrew the cap and look for evidence of corrosion, wear and cracks. The distributor cap and rotor should be replaced together. Before putting on a new cap, make sure to label each spark plug wire with the number of its corresponding piston. This will eliminate misfires caused by connecting the wires to the wrong terminals. Simply put the new rotor back in and then bolt on the new distributor cap. Put dialectric grease on each terminal of the distributor cap and replace the wires. Check all the wiring and connections. Clean and tighten all the terminals and make sure the wires are not chafing or rubbing anywhere.
Check the ignition coil.
Remove the ignition coil unit from the engine. At this time check the wires to make sure that the insulation is intact and that the connector is solid. To check your ignition coil, simply connect it into your ohm-meter. Compare the resistance that you get from the meter against what’s specified in your car’s service manual. If it is not within the specified range, it must be replaced. If it is in good working order, simply reconnect it.
Service the battery.
Before working with the battery, put on a pair of rubber gloves and goggles. This will protect your hands from acid and protect your eyes from sparks. Always remove the negative terminal first. This disconnects the battery from the system altogether and reduces the chance of sparks. If the battery terminals do not come off easily, use a battery puller tool to take them off. Do not use a screwdriver to pry the terminals off, because it can break the battery post internal connections. Take your battery terminal cleaning tool, which has different extensions for different sized terminals and use it to clean off the terminals and posts. While the terminals are disconnected, connect the voltmeter to the battery. This will give you a reading of the voltage in the battery. It should read around 12.6 volts. If it is much less than this, the battery will need to be replaced or the charging system will need to be repaired.
Finish the job!
Check all your connections again to make sure they are tight, replace the ignition coil’s primary wire. Start your engine, and it should be running like new.
As always, if you don’t feel comfortable doing any of these procedures, do not hesitate to make an appointment with one of the qualified mechanics at Pep Boys. But, even if you don’t do the work yourself, knowing about how your car works and some terminology will help you communicate better with your mechanic.
Service Your Ignition
by
Tags:
Leave a Reply